NotesとQtでWindows、Mac OS X、Ubuntuのデスクトップアプリ(その11 - 実行・完結編)
それでは、前回までのライブラリを使用して、一気にデスクトップアプリ「IntroQt」を作ります。
まず、メインソースコードです。
// main.cpp

#include "dialog.h"
#include <QApplication>

#include <lmbcs.h>

int main(int argc, char *argv[])
{
  ntlx::Status status = NotesInitExtended(argc, argv);
  if (status.failure())
    return -1;

  QApplication a(argc, argv);
  Dialog w;
  w.show();

  int result = a.exec();

  NotesTerm();

  return result;
}
NotesInitExtended関数は、Notes APIを初期化します。アドインライブラリやサーバータスクのような、NotesクライアントやDominoサーバから呼び出すことを前提とするものを除き、Notes APIを使用する場合は必ず初期化します。
プログラムを終える時は、NotesTermで終了処理をします。
次は、ダイアログクラスの定義(ヘッダーファイル)です。
// dialog.h

#ifndef DIALOG_H
#define DIALOG_H

#include <QDialog>

namespace Ui {
class Dialog;
}

class Dialog : public QDialog
{
  Q_OBJECT

public:
  explicit Dialog(QWidget *parent = 0);
  ~Dialog();

public slots:
  void pathChanged(const QString& path);
  void getTitle();

private:
  Ui::Dialog* ui_;
};

#endif // DIALOG_H
Dialogクラスは、Qt WidgetのQDialogを継承します。UI部品は、Qt Designerを使って作成します。Ui::Dialogクラスはその連携クラスになります。
Qtのシグナル/スロット機構は、とてもよくできた通知システムだと思います。今回は、パスの内容を変更するとpathChangedが、タイトル取得ボタンをクリックするとgetTitleがそれぞれシグナル/スロット機構を通して呼び出されるようにしています。
Qtのシグナル/スロット機構を詳しく知りたい方は、Webなどを検索してみてください。日本語書籍であれば、入門 Qt4 プログラミングがおすすめです。10年も前の本ですし、Qt4の時代のものですが、遜色なく読めると思います。あえて追記するなら、Qt5で新しいシンタックスが登場しているので、英語ですが、New Signal Slot Syntax in Qt 5をご覧ください。
次はDialogクラスの実装(ソースファイル)です。
// dialog.cpp

#include "dialog.h"
#include "ui_dialog.h"

#include <QMessageBox>
#include <database.h>
#include <lmbcs.h>

Dialog::Dialog(QWidget *parent)
  : QDialog(parent)
  , ui_(new Ui::Dialog)
{
  ui_->setupUi(this);

  connect(ui_->buttonBox->button(QDialogButtonBox::Close)
          , &QPushButton::clicked
          , this, &Dialog::close
          );

  connect(ui_->pathLineEdit, &QLineEdit::textChanged
          , this, &Dialog::pathChanged
          );

  connect(ui_->getTitleButton, &QPushButton::clicked
          , this, &Dialog::getTitle
          );
}

Dialog::~Dialog()
{
  delete ui_;
}

void Dialog::pathChanged(const QString &path)
{
  ui_->getTitleButton->setEnabled(!path.isEmpty());
}

void Dialog::getTitle()
{
  ntlx::Status status;
  ntlx::Database db(ui_->pathLineEdit->text()
                    , ui_->serverLineEdit->text()
                    , QString()
                    , &status);
  if (status.failure())
    QMessageBox::critical(this
                          , tr("Error")
                          , ntlx::Lmbcs(status).toQString()
                          );

  QString title = db.getTitle();
  ui_->titleLineEdit->setText(title);
}
pathChangedスロットメソッドは、パス入力欄のテキスト変更を検知するとスロットされます。受け取った変更済みテキストが空かどうかをチェックして、タイトル取得ボタンを有効にするかどうかを設定します。Notesデータベースはサーバ名は省略できますが、パスは省略できないので、このスロットは空のテキストを処理しないための仕組みです。
タイトル取得ボタンをクリックすると、getTitleスロットメソッドが呼び出されます。ntlxライブラリを活用して、データベースのタイトルを取得し、もう一つの入力欄に表示します。
続いて、Ui::DialogクラスのQt Designer定義です。
<!-- dialog.ui -->

<?xml version="1.0" encoding="UTF-8"?>
<ui version="4.0">
 <class>Dialog</class>
 <widget class="QDialog" name="Dialog">
  <property name="geometry">
   <rect>
    <x>0</x>
    <y>0</y>
    <width>320</width>
    <height>199</height>
   </rect>
  </property>
  <property name="windowTitle">
   <string>Dialog</string>
  </property>
  <layout class="QVBoxLayout" name="verticalLayout">
   <item>
    <layout class="QFormLayout" name="formLayout_3">
     <item row="0" column="0">
      <widget class="QLabel" name="serverLabel">
       <property name="text">
        <string>Server</string>
       </property>
      </widget>
     </item>
     <item row="0" column="1">
      <widget class="QLineEdit" name="serverLineEdit"/>
     </item>
     <item row="1" column="0">
      <widget class="QLabel" name="pathLabel">
       <property name="text">
        <string>Path</string>
       </property>
      </widget>
     </item>
     <item row="1" column="1">
      <widget class="QLineEdit" name="pathLineEdit"/>
     </item>
    </layout>
   </item>
   <item>
    <widget class="QPushButton" name="getTitleButton">
     <property name="enabled">
      <bool>false</bool>
     </property>
     <property name="text">
      <string>Get Title</string>
     </property>
    </widget>
   </item>
   <item>
    <layout class="QFormLayout" name="formLayout_2">
     <item row="0" column="0">
      <widget class="QLabel" name="titleLabel">
       <property name="text">
        <string>Title</string>
       </property>
      </widget>
     </item>
     <item row="0" column="1">
      <widget class="QLineEdit" name="titleLineEdit"/>
     </item>
    </layout>
   </item>
   <item>
    <spacer name="verticalSpacer">
     <property name="orientation">
      <enum>Qt::Vertical</enum>
     </property>
     <property name="sizeHint" stdset="0">
      <size>
       <width>20</width>
       <height>4</height>
      </size>
     </property>
    </spacer>
   </item>
   <item>
    <widget class="QDialogButtonBox" name="buttonBox">
     <property name="standardButtons">
      <set>QDialogButtonBox::Close</set>
     </property>
    </widget>
   </item>
  </layout>
 </widget>
 <layoutdefault spacing="6" margin="11"/>
 <resources/>
 <connections/>
</ui>
さすがにこれはソースコードを見ただけではわかりにくいでしょう。後半にイメージを載せているので、参考にしてみてください。
最後にプロジェクトファイルです。
# introqt.pro

#-------------------------------------------------
#
# Project created by QtCreator 2017-03-11T16:33:52
#
#-------------------------------------------------

QT       += core gui

greaterThan(QT_MAJOR_VERSION, 4): QT += widgets

TARGET = introqt
TEMPLATE = app

# The following define makes your compiler emit warnings if you use
# any feature of Qt which as been marked as deprecated (the exact warnings
# depend on your compiler). Please consult the documentation of the
# deprecated API in order to know how to port your code away from it.
DEFINES += QT_DEPRECATED_WARNINGS

# You can also make your code fail to compile if you use deprecated APIs.
# In order to do so, uncomment the following line.
# You can also select to disable deprecated APIs only up to a certain version of Qt.
#DEFINES += QT_DISABLE_DEPRECATED_BEFORE=0x060000    # disables all the APIs deprecated before Qt 6.0.0

SOURCES += main.cpp\
        dialog.cpp

HEADERS  += dialog.h

FORMS    += dialog.ui

DISTFILES += \
    .gitignore

win32 {
    DEFINES += W32 NT
}
else:macx {
    DEFINES += MAC
}
else:unix {
    DEFINES += UNIX LINUX W32
    QMAKE_CXXFLAGS += -std=c++0x
}

LIBS += -lnotes -lntlx

INCLUDEPATH += $$PWD/../ntlx
DEPENDPATH += $$PWD/../ntlx
インクルードパスとライブラリに、ntlxを追加しています。「$$PWD」は「現在のソースコードの場所」を意味します。本来ならインクルードパスはビルド時の設定に逃がすべきですが、同一プロジェクトフォルダ上でコーディングしていれば、このような書き方も有効です。
コード類は以上です。
次は、各プラットフォームごとのビルド設定、実行時設定のトピックです。
# Windows

## ビルド時の追加の引数

"INCLUDEPATH+=Z:/Users/Shared/notesapi/include" "LIBS+=-LZ:/Users/Shared/notesapi/lib/mswin32 -L$$PWD/../build-ntlx-Desktop_Qt_5_6_2_MSVC2013_32bit-Debug/debug"

## 実行時の環境変数

PATH=%PATH%;C:\Program Files (x86)\IBM\Notes
Windowsでは、Unix系と違い、パスの区切りがバックスラッシュ(日本語での表記は円記号)になります。qmakeに渡すパスは、Windowsであってもスラッシュを使います。
Notes APIへのパスに加え、ntlxへのパスも追加します。ntlxのインポートライブラリを指すように、相対パスで指定しています。
# Mac

## ビルド時の追加の引数

"INCLUDEPATH+=/Users/Shared/notesapi/include" "LIBS+=-L'/Applications/IBM Notes.app/Contents/MacOS' -L\$\$PWD/../build-ntlx-Desktop_Qt_5_6_2_clang_64bit-Debug"
MacやLinuxのようなUnix系の場合、「$」記号は意味を持ってしまうため、バックスラッシュでエスケープする必要があるため、「\$\$PWD」のような書き方になります。
# Linux(Ubuntu)

## ビルド時の追加の引数

"INCLUDEPATH+=/opt/ibm/notesapi/include" "LIBS+=-L/opt/ibm/notes -Wl,-rpath,/opt/ibm/notes -L\$\$PWD/../build-ntlx-Desktop_Qt_5_5_1_GCC_32bit-Debug"

## 実行時の環境変数

Notes_ExecDirectory=/opt/ibm/notes
Linux(Ubuntu)では、実行時に環境変数「Notes_ExecDirectory」を使って、Notesプログラムディレクトリを見つけます。ビルド時には必要ないですが、実行時には指定するようにします。
ここまでで問題がなければ、各OSでコンパイルしてデバッグ実行してみましょう。
Windows
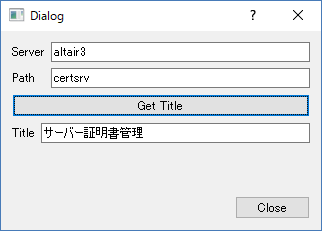
Windowsのアプリケーション例です。パスワードが必要な場面になると、次のようなダイアログを表示します。
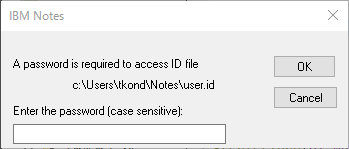
コンソールアプリケーションであれば、標準入力から入力することになります。
MacOSX
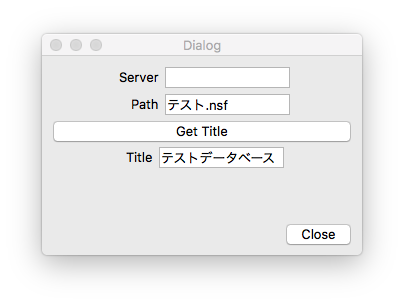
Macのアプリケーション例です。私の環境では、Macではパスワードが必要な場面で標準入力から入力するようです。ダイアログが表示されてしかるべきなのですが、方法がわかりません。Qt Creatorのデバッグ実行が、標準入力を握ってしまい、どうしてもパスワードを入力できませんでした。結局、Mac版Notesクライアント独特の機能「キーチェーンにパスワードを保存する」で、一種のパスワードレス状態にすることで、デバッグ実行することができました。
Linux(Ubuntu)
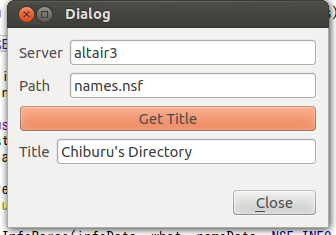
Ubuntuのアプリケーション例です。パスワードが必要な場面になると、次のようなダイアログを表示します。
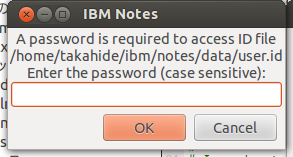
未確認ですが、コンソールアプリケーションであれば、標準入力から入力することになると思います。
最後は、ほぼほぼ駆け足ですが、Qtデスクトップアプリケーションとしてはとても一般的な話であるのでご容赦ください。
Notes/DominoとQtフレームワーク、どちらもマルチプラットフォームに対応しています。一度これを、一つのソースコードで、それぞれのOS用にコンパイルして、実行してみたいという小さな夢が実現できました。長編をおつきあいくださり、ありがとうございました。